Sunday, August 28, 2011

Zucchini Cake Sandwich Cookies

This past week I have lived through an earthquake, a hurricane, and a tornado warning. Sounds impressive, huh? In actuality it was a little tremor that lasted 5 seconds, a heavy rainstorm, and no tornado. We were bracing for 8-12 inches of rain, but only got around 5. Forget that 3 1/2 of that ended up in our basement...

Alright, back to baking! It's zucchini season! If you have a garden and have planted zucchini, or know anyone who has, then you know how sometimes you can get a few too many zucchini. I love growing it and making both sweet and savory things, but I kind of get stuck in a rut by the end of it all. I remember a couple of summers ago when we had zucchini in every meal for a week. I think that was the week I decided to start shredding and freezing what zucchini we had left.


I was so excited when one of the first zucchini recipes I found this season was for something I had never made before. Jenn over at Eat Cake For Dinner made some zucchini cake sandwich cookies modeled after carrot cake sandwich cookies. Genius! This year my little girl planted the seeds for our zucchini, so it's fun to tell her that we are eating what she planted. And it's even better when it's for dessert!


Zucchini Cake Sandwich Cookies
Adapted from Eat Cake For Dinner
Printer Friendly Version

1 1/4 cup all-purpose flour
1/2 tsp baking soda
1/2 tsp baking powder
1/4 tsp salt
1 tsp cinnamon
pinch of nutmeg
1/2 cup butter-flavored shortening
1/2 cup light brown sugar, packed
1/4 cup + 2 tbsp granulated sugar
1 large egg
1 tsp vanilla extract
1 cup oats
1 cup grated zucchini
Cream Cheese Frosting, recipe below

Preheat oven to 350 degrees.

In a small bowl, whisk together flour, baking soda, baking powder, salt, cinnamon and nutmeg; set aside. Cream together the shortening, brown sugar, and granulated sugar until very light and fluffy. Add the egg and vanilla and mix until combined.

Add the dry ingredients to the wet ingredients and mix until just combined. Add the oats and grated zucchini and mix very well. Dough will be pretty sticky, and will spread when baking. Drop dough onto prepared baking sheet, using a small cookie scoop.

Bake for 12 minutes or until lightly browned. Cool completely.

Spread cream cheese frosting on the flat side of one cookie and top with the flat side of another cookie. Store in the refrigerator.


Cream Cheese Frosting

8 oz cream cheese (1 cube), room temperature
12 tbsp unsalted butter (1 1/2 cubes), room temperature
1/2 tsp vanilla extract
1/4 tsp almond extract
2 cups confectioners sugar, sifted

In the bowl of an electric mixer fitted with a paddle attachment, blend together the cream cheese, butter, vanilla, and almond extracts. Add the confectioners sugar and mix until smooth.

Sunday, August 21, 2011

Strawberry Muffins

In these dwindling days of summer, I was drawn in by an ad at my local grocery store. Buy one, get one free on strawberries. I bought some knowing that this might be the last sale of this kind we have before next year. I had no idea what I was going to do with them, just that I wanted to try to bake something with them.

My friend sold her house and was kind of in panic mode the night before closing. I texted her and told her I'd come over to help with the last packing and cleaning. I wanted to take something that she could feed the kids the morning of closing and not have to worry about a mess or the stress of finding something to eat. And thus was born strawberry muffins.


I googled a few different recipes, but it came down to tweaking a couple of recipes on the Joy of Baking website to get what I wanted. This recipe calls for brown sugar rather than white sugar. Using brown sugar gives it a richer flavor and color. I also used sour cream to make a more dense muffin and to add some moisture, but you could easily substitute plain yogurt, or maybe tweak the recipe and use buttermilk for a lighter texture.


All in all, I was really pleased with the muffins. I loved the extra flavor the cinnamon added, and it was so fun to eat a muffin that was different from the norm! They were exactly what I was hoping for, and I hope my friend enjoyed them on that hectic morning!


Strawberry Muffins
adapted from Joy of Baking
Printer Friendly Version

½ cup unsalted butter, melted
2 large eggs, lightly beaten
1 tsp vanilla extract
½ cup sour cream
1 ½ cups fresh strawberries, cut into small pieces
2 ¼ cups all purpose flour
¾ cup light brown sugar
1 ½ tsp baking powder
¼ tsp baking soda
1 tsp ground cinnamon
½ tsp salt

Preheat oven to 350 degrees. Line a 12 cup muffin pan with paper liners or lightly butter or spray the muffin cups with a vegetable spray.

In a small saucepan melt the butter and let cool to room temperature.

In a medium sized bowl whisk together the eggs, vanilla extract and sour cream. Add the melted butter and stir to combine.

In another large bowl combine the flour, sugar, baking powder, baking soda, cinnamon, and salt. Gently fold in the berries, making sure they are coated with flour. (This helps to prevent the berries from sinking during baking.) Add the wet ingredients to the dry ingredients and stir only until the ingredients are just combined. Do not over mix the batter or you will get tough muffins.

Divide the batter evenly among the 12 muffin cups, using an ice cream scoop. Place in the oven and bake until a tester inserted in the center of a muffin comes out clean, about 20 to 25 minutes. Transfer to a wire rack to cool.

Can be stored for a few days at room temperature.

Monday, August 15, 2011

Sinfully Sinless Tiramisu

At the beginning of July I started a '30 before 30' list. My birthday has come and gone and I accomplished 14 things on the list. Given that it was started a month before my 30th birthday, I'm happy with that, but I'm going to keep going until I do everything on that list.

One of my goals was to cook something with an ingredient I've never used. My dad was coming for a visit and I knew that he would enjoy the Sinfully Sinless Tiramisu that I found over at Mel's Kitchen Cafe. It actually called for two ingredients I had never used - ladyfingers, and rum extract. Here's a tip when you're looking for ladyfingers - I looked at 3 different stores and finally found them in the international food aisle, near the pasta.


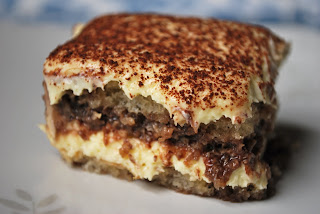
So what do it mean by "sinfully sinless?" Well, this recipe substitutes cocoa powder and rum extract for the espresso/rum mixture and the coffee granules. So for those, including me, who abstain from coffee, this title is fitting. Now, I've never actually had tiramisu, so I can't be the best judge. But, I thought it was good. I couldn't find mascarpone cheese in any of my grocery stores (maybe I was looking in the wrong place?), so I had to use cream cheese. My dad said that it was missing the bite of the coffee granules and he could taste the cream cheese, but he enjoyed it. It was a nice, light dessert to finish off the night. So if you're looking for something different, give this a try!


Sinfully Sinless Tiramisu
from Mel's Kitchen Cafe
Printer Friendly Version
*Serves 6-8

1 ½ cups good-quality hot chocolate, made with water and using 1 ½ times the hot chocolate powder
½ teaspoon rum extract
½ tablespoon pure vanilla extract
4 large egg yolks
½ cup granulated sugar
1/8 teaspoon salt
¼ cup heavy whipping cream
8 ounces mascarpone cheese (can sub cream cheese in a pinch)
½ cup heavy whipping cream
About 36 crisp ladyfingers cookies/biscuits
1 tablespoon natural cocoa powder

Make the hot cocoa according to the instructions above – using water instead of milk and using 1 ½ the amount of hot chocolate powder you would normally use to make a cup for drinking. Allow the hot cocoa to cool while you are preparing the rest of the recipe. Once it is lukewarm, add the vanilla and imitation rum extract. Due to the high cocoa to water ratio, whisk the cocoa mixture frequently to keep the cocoa suspended.

Set a medium saucepan over medium heat and fill with about 1-2 inches water. Let it come to a simmer while you proceed with the recipe. In a medium bowl (an appropriate size to be placed on the pan that is heating), beat the egg yolks at low speed with a mixer (hand or electric) until just combined. Add the ½ cup sugar and salt and beat at medium-high speed until pale yellow, 1 1/2 to 2 minutes, scraping down the bowl with a rubber spatula once or twice. Add ¼ cup cream to the yolks and beat at medium speed until just combined, 20 to 30 seconds; scrape the bowl. Set the bowl with the yolks over the saucepan of water that has come to a simmer. Cook the egg yolk mixture, stirring constantly and scraping along the bottom and sides of the bowl with a heatproof rubber spatula, until the egg yolk mixture coats the back of a spoon, about 4 to 7 minutes. Remove the bowl from the heat and stir vigorously to cool slightly, then set aside to cool to room temperature, about 15 minutes.

Add the mascarpone cheese to the cooled mixture and beat at medium speed until no lumps remain, about a minute. Transfer the mixture to a large bowl and set aside. In the now-empty bowl (no need to clean the bowl), beat the ½ cup heavy whipping cream at medium-high speed until stiff peaks form. Using a rubber spatula, fold 1/3 of the whipped cream into the mascarpone mixture. Then gently fold in the remaining whipped cream until no white streaks remain. Set the mixture aside.

Give the hot cocoa mixture a good whisk to combine. Pour it into a shallow baking dish like a pie plate. Dip 1 ladyfinger into the hot cocoa at a time, allowing it to soak up the hot cocoa for about 1-2 seconds per side. Transfer each ladyfinger immediately to an 8-inch square baking dish. Lay the cookies side-by-side to create one even layer. You may have to trim/break the soaked cookies to fit the pan. After finishing the first layer of ladyfinger cookies, spread half of the mascarpone cream mixture evenly over the ladyfingers, spreading to the edges of the pan. Using a small fine-mesh strainer, sprinkle 1/2 tablespoon of the natural cocoa powder over the mascarpone layer.

Repeat the soaking process with the ladyfingers, creating one more layer of ladyfinger cookies over the mascarpone/cocoa layer. Spread evenly with the remaining mascarpone mixture. Dust with the final 1/2 tablespoon of natural cocoa powder. Refrigerate for at least 4 hours to chill and set. This can be made up to 1 day in advance. Cut into squares and serve.

Sunday, August 7, 2011

Thin Mint Cake

I've officially entered my 30's. Kinda cool. Kinda crazy. I had pinned this thin mint cake from i am baker months ago knowing it would be my birthday cake. I even told my husband I would make it, which I did. But he assembled and frosted it and did a beautiful job, telling me that he tried to make it blog-worthy.


A few notes about this cake. You use a boxed cake mix. You add banana and cinnamon.

Here were my initial thoughts. I could taste the banana and cinnamon because I knew it was in there. My husband, who has a very sophisticated palate, could not taste them until I had told him they were in there. The texture was very much like a boxed cake mix, just a little more moist because of the banana.


Texture aside, I really liked this cake. I go crazy for anything chocolate mint, so it is a perfect match for me. Next time I make it I'm going to make a chocolate cake from scratch and add in the peppermint extract, cinnamon, and banana. I used a different buttercream recipe than i am baker's, and thought it was good. Really easy, too.


Thin Mint Cake
from i am baker
Printer Friendly Version

1 box chocolate cake mix
1 cup water
2 sticks butter (softened)
4 eggs
1/2 ripe banana, mashed
1 tbsp. cinnamon
1 tbsp. + 1/4 tsp peppermint extract
1/3 cup extra virgin olive oil

Heat oven to 325 degrees.

Combine all ingredients in a mixer on low for thirty seconds, then increase speed to medium and mix until just combined.

Pour into prepared pans (I used two 8 in pans) and bake for 30-40 minutes or until an inserted toothpick comes out clean.


Quick Vanilla Buttercream Frosting
from Gale Gand

3 cups confectioners' sugar
1 cup butter
1 teaspoon vanilla extract
1 to 2 tablespoons whipping cream

In a standing mixer fitted with a whisk, mix together sugar and butter. Mix on low speed until well blended and then increase speed to medium and beat for another 3 minutes.

Add vanilla and cream and continue to beat on medium speed for 1 minute more, adding more cream if needed for spreading consistency.