Monday, October 24, 2011

Apple Cider Pudding Cake

My kids and I drove out to an apple orchard last week to meet up with some friends. There's just something about picking apples off of a tree and freshly pressed cider from an apple orchard that just say Fall to me. And this pudding cake from Mel's Kitchen Cafe? It looks, tastes, and smells like Fall. Not to mention that it will make your house smell oh-so-good.


I love the mix of textures you get when you bite into this cake. First you have the sweet buttery crunchy streusel topping. Then you've got the moist cake. Next up is soft, caramelized apples. Finish it off with a cinnamon spice pudding and you've got yourself a winner.

It's recommended that you eat it warm with a scoop of vanilla ice cream, and you really can't go wrong doing this. But I actually kind of enjoyed it cold for breakfast. Either way, you will not be sorry.


Apple Cider Pudding Cake
from Mel's Kitchen Cafe
Printer Friendly Version

Cake:
1 cup flour
2 teaspoons baking powder
1/4 teaspoon salt
1/4 teaspoon baking soda
1 teaspoon cinnamon
1/2 teaspoon ginger
1/4 teaspoon nutmeg
1 large egg
1 cup packed brown sugar
1/3 cup milk
2 tablespoons melted butter
1 teaspoons vanilla
2 cups chopped Granny Smith apples

Boiling Mixture:
1 cup apple cider (apple juice can be substituted if apple cider can't be found)
1/2 teaspoon cinnamon
1 teaspoon vanilla
1/2 cup brown sugar

Streusel:
1/4 cup flour
1/4 cup brown sugar
2 tablespoons cold butter

Butter an 8x8 inch square baking dish. Heat oven to 350 degrees.

In a bowl combine the flour, baking powder, salt, soda, 1 teaspoon cinnamon, ginger and nutmeg. In another bowl, whisk together the egg, 1 cup brown sugar, milk, melted butter and 1 teaspoon vanilla. Stir in dry ingredients until just combined. Gently fold in apples. Spread in prepared pan.

In a small saucepan, bring apple cider, 1/2 teaspoon cinnamon, 1 teaspoon vanilla and 1/2 cup brown sugar to a boil. Pour slowly and carefully over the batter. Bake for 35 minutes. Meanwhile, cut butter into streusel ingredients with a fork or pastry blender until butter is cut up and mixture is crumbly. After the cake has baked for 35 minutes, sprinkle streusel topping evenly over the cake and bake 8-10 minutes more (until a toothpick inserted into the top layer of the cake comes out clean or with a few moist crumbs).

Serve warm with a scoop of vanilla ice cream.

Tuesday, October 18, 2011

Classic Chocolate Cupcakes

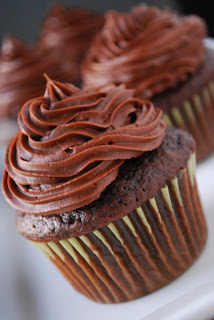
Thanks to my friends over at Williams-Sonoma, I found out that today is National Chocolate Cupcake Day. I immediately told my husband who responded with, "Are we celebrating?" Um, yeah!

I set out to find the perfect recipe, and I think this is pretty darn close. The cake is perfectly moist and light, and the chocolate flavor is spot on. And the frosting. Oh, the frosting. It is genius. I'll be honest when I say that I have never combined chocolate and cream cheese in a frosting before. Where on earth have I been?! I, lover of all things cream cheese, was blown away. I don't know that I can ever go back. And I now have a go-to chocolate cupcake recipe. All in all I'd say it was a pretty successful day!

I wanted to hurry and get this posted before the day is over so that you all can get yourself a chocolate cupcake to celebrate. Enjoy!


Classic Chocolate Cupcakes
Adapted from Martha Stewart's Cupcakes and Annie's Eats
Makes 24 cupcakes
Printer Friendly Version

½ cup plus 1 tablespoon Dutch-process cocoa powder
½ cup plus 1 tablespoon hot water
2¼ cups all-purpose flour
¾ tsp baking soda
¾ tsp baking powder
½ tsp salt
2 sticks plus 1 tablespoon unsalted butter, room temperature
1 2/3 cups sugar
3 large eggs, room temperature
1 tbsp vanilla extract
¾ cup sour cream

Preheat the oven to 350˚F. Line cupcake pans with paper liners. In a small bowl, combine the cocoa powder and hot water and whisk until smooth. In another medium bowl combine the flour, baking soda, baking powder, and salt, and whisk to blend.

Combine the butter and sugar in a medium saucepan set over medium heat. Cook, stirring occasionally, until the mixture is smooth and the butter is completely melted. Transfer the mixture to the bowl of an electric mixer and beat on medium-low speed until the mixture is cool, about 4-5 minutes. Add the eggs one at a time, mixing well after each addition and scraping down the sides of the bowl as needed. Blend in the vanilla and then the cocoa mixture until smooth. With the mixer on low speed, add the flour mixture in three additions alternating with the sour cream, beginning and ending with the dry ingredients and mixing each addition just until incorporated.

Divide the batter evenly between the prepared liners. Bake until a toothpick inserted in the center comes out clean, about 18-20 minutes, rotating the pans halfway through baking. Let cool in the pan about 5-10 minutes, then transfer to a wire rack to cool completely.


Chocolate Frosting

9.3 oz bittersweet chocolate, finely chopped
6 oz cream cheese, room temperature
6 tbsp unsalted butter, room temperature
2 cups confectioners’ sugar, sifted
4 tbsp unsweetened Dutch-process cocoa powder
Pinch of salt
2/3 cup plus 2 tsp sour cream

Melt the chocolate in a heat-proof bowl set over a pot of simmering water. Set aside to cool until just barely warm. In the bowl of a stand mixer fitted with the paddle attachment, beat the cream cheese and butter on medium-high speed until pale and fluffy, about 3-4 minutes. Gradually mix in the confectioners’ sugar, cocoa powder and salt. Beat in the melted and cooled chocolate and then the sour cream. Continue beating until the mixture is smooth and well blended. Frost cupcakes immediately.

Sunday, October 2, 2011

Overnight Cinnamon Rolls

There is nothing like waking up to some fresh, hot-out-of-the-oven cinnamon rolls. But really, who has the time to make the dough, let it rise, roll it out and shape it, let it rise again, and then bake it in the morning? Not I.


I really wanted some cinnamon rolls for breakfast, but I wanted them to be freshly baked. I vaguely remembered that Alton Brown had a recipe for some overnight cinnamon rolls. His method still takes some time in the morning, approximately an hour and a half. But with a little prep work the night before and some inactive work in the morning, we had some tender, sweet, cinnamon rolls to enjoy on this crisp October morning.


I used an 18 by 13 inch jelly roll pan because I wanted them to be spaced apart so all of the rolls would have an outer crust. If you prefer to have some with a crust and some without, just use a 9 by 13 inch pan. Either way, they are delightful.


Overnight Cinnamon Rolls
Adapted from Alton Brown
Printer Friendly Version

Dough
4 large egg yolks, room temperature
1 large whole egg, room temperature
1/4 cup sugar
6 tbsp unsalted butter, melted
6 ounces buttermilk, room temperature
4 cups all-purpose flour, plus additional for dusting
1 package instant dry yeast, approximately 2 1/4 teaspoons
1 1/4 teaspoons kosher salt
Vegetable oil or cooking spray

Filling
1 cup light brown sugar, packed
1 tablespoon ground cinnamon
Pinch salt
4 tbsp unsalted butter, melted, using some to butter your pan
1/2 cup walnuts
1/2 cup raisins

Icing
1/4 cup cream cheese, softened
3 tablespoons milk
1 1/2 cups powdered sugar

For the dough: in the bowl of a stand mixer with the whisk attachment, whisk the egg yolks, whole egg, sugar, butter, and buttermilk. Add approximately 2 cups of the flour along with the yeast and salt; whisk until moistened and combined. Remove the whisk attachment and replace with a dough hook. Add all but 3/4 cup of the remaining flour and knead on low speed for 5 minutes. Check the consistency of the dough, add more flour if necessary; the dough should feel soft and moist but not sticky. Knead on low speed 5 minutes more or until the dough clears the sides of the bowl. Turn the dough out onto a lightly floured work surface; knead by hand about 30 seconds. Lightly oil a large bowl. Transfer the dough to the bowl, lightly oil the top of the dough, cover and let double in volume, 2 to 2 1/2 hours.

Combine the brown sugar, cinnamon and salt in a medium bowl. Mix until well incorporated. Set aside until ready to use.

Butter an 18 by 13-inch jelly roll pan (a 9x13 glass pan can be used as well). Turn the dough out onto a lightly floured work surface. Gently shape the dough into a rectangle with the long side nearest you. Roll into an 18 by 12-inch rectangle. Brush the dough with the 3/4-ounce of melted butter, leaving 1/2-inch border along the top edge. Sprinkle the filling mixture, walnuts, and raisins over the dough, leaving a 3/4-inch border along the top edge; gently press the filling into the dough. Beginning with the long edge nearest you, roll the dough into a tight cylinder. Firmly pinch the seam to seal and roll the cylinder seam side down. Very gently squeeze the cylinder to create even thickness. Using a serrated knife, slice the cylinder into 1 1/2-inch rolls; yielding 12 rolls. Arrange rolls cut side down in the baking dish; cover tightly with plastic wrap and store in the refrigerator overnight or up to 16 hours.

Remove the rolls from the refrigerator and place in an oven that is turned off. Fill a shallow pan 2/3-full of boiling water and set on the rack below the rolls. Close the oven door and let the rolls rise until they look slightly puffy; approximately 30 minutes. Remove the rolls and the shallow pan of water from the oven.

Preheat the oven to 350 degrees F.

When the oven is ready, place the rolls on the middle rack and bake until golden brown, or until the internal temperature reaches 190 degrees F on an instant-read thermometer, approximately 25 minutes.

While the rolls are cooling slightly, make the icing by whisking the cream cheese in the bowl of a stand mixer until creamy. Add the milk and whisk until combined. Sift in the powdered sugar, and whisk until smooth. Spread over the rolls and serve immediately.

Monday, September 19, 2011

m&m Chocolate Chip Cookies

My little girl is off to her first day of preschool. I'm kind of sad just sitting here alone (well, my baby is upstairs napping...), but at the same time I'm so excited for her! She is going to absolutely love it and I'm going to love the extra bit of free time I'll have while she's gone.

So today I thought I'd post a simple recipe, but one that I love making with my little girl. She loves m&ms, and they help to make this cookie extra special just for her. So if you have kids, maybe you could whip up a batch when they get home from school and bring a little smile to their faces.


m&m Chocolate Chip Cookies
adapted from Baking Illustrated
Printer Friendly Version

2 cups plus 2 tablespoons (10 5/8 ounces) unbleached all-purpose flour
1/2 teaspoon baking soda
1/2 teaspoon salt
12 tablespoons (1 1/2 sticks) unsalted butter, melted and cooled until warm
1 cup packed (7 ounces) light or dark brown sugar
1/2 cup (3 1/2 ounces) granulated sugar
1 large egg plus 1 egg yolk
2 teaspoons vanilla extract
1-1 1/2 cups semisweet chocolate chips
1 cup plain m&ms

Preheat the oven to 325 degrees. Line 2 large baking sheets with parchment paper or spray them with nonstick cooking spray.

Whisk the flour, baking soda, and salt together in a medium bowl; set aside.

Either by hand or with an electric mixer, mix the butter and sugars until thoroughly blended. Beat in the egg, yolk, and vanilla until combined. Add the dry ingredients and beat at low speed just until combined. Stir in the chips to taste.

Using a medium cookie scoop, scoop dough onto prepared baking sheet about 1-inch apart. Press m&m's into the balls of cookie dough. Bake for 10 to 12 minutes until the cookies are light golden brown and the outer edges start to harden yet the centers are still soft and puffy. Let cool for 5 minutes before transferring to cooling rack.

Sunday, September 11, 2011

Simple Stovetop Rice Pudding

I just spent the week in the Poconos Mountains in Northeastern PA. When we planned the trip we envisioned hiking through the mountains, canoeing on the Delaware, and enjoying the great outdoors. And then we got rained on. A lot. There was major flooding in the region, and we had to drive through 2 feet of water on the road to get to our destination. Let me tell you, all of that rain and cold weather made me wish for some warm comfort food. And rice pudding is just the ticket!

Thick. Rich. Creamy. Delicious. These are words that describe this simple rice pudding. The recipe is from my trusty America's Test Kitchen, and they have not failed me. I was a bit skeptical as to whether or not it would end up creamy and rich without the addition of an egg, but was it ever. The flavors were spot on, with the rice coming out as the star.


The finished product took me about an hour and 45 minutes, and we ate it when it was still pretty warm. With that amount of time invested, it had better be worth it. And I actually think it was. I've had many different rice puddings in my day, but this one is definitely at the top. I honestly don't think I would change anything about the recipe. Oh, and just a tip - when they say to use a 3 quart pan or larger, listen. I was amazed at how large the batch was, especially considering that you only use one cup of rice. My 5 quart Le Creuset worked perfectly for me.


Simple Stovetop Rice Pudding
from America's Test Kitchen
Printer Friendly Version

2 cups water
1/4 tsp salt
1 cup medium-grain rice
2 1/2 cups whole milk *
2 1/2 cups half-and-half *
2/3 c sugar
1 1/4 tsp vanilla extract
1/2 cup raisins
1 tsp ground cinnamon

Bring the water to a boil in a large, heavy-bottomed saucepan (at least 3 quarts). Stir in the salt and rice; cover and simmer over low heat, stirring once or twice, until the water is almost fully absorbed, 15 to 20 minutes.

Add the milk, half-and-half, and sugar. Increase the heat to medium-high and bring to a simmer, then reduce the heat to maintain a simmer. Cook, uncovered and stirring frequently, until the mixture starts to thicken, about 30 minutes. Reduce the heat to low and continue to cook, stirring every couple of minutes to prevent sticking and scorching, until a spoon is just able to stand up in the pudding, about 15 minutes longer.

Remove from the heat and stir in the vanilla, 1/2 cup raisins, and 1 tsp ground cinnamon. Cool and serve at room temperature or chilled. (To store, press plastic wrap directly on the surface of the pudding and refrigerate for up to 2 days.)

* When a recipe calls for varying amounts of dairy products, rather than making a trip to the store, I use what I have on hand and mix until I have the right consistency. For instance, I only had 1% milk and heavy cream on hand for this recipe, so I used 3 cups of 1% milk and 2 cups of heavy cream to get the right mix. I just kind of do what makes sense in my head.

Sunday, August 28, 2011

Zucchini Cake Sandwich Cookies

This past week I have lived through an earthquake, a hurricane, and a tornado warning. Sounds impressive, huh? In actuality it was a little tremor that lasted 5 seconds, a heavy rainstorm, and no tornado. We were bracing for 8-12 inches of rain, but only got around 5. Forget that 3 1/2 of that ended up in our basement...

Alright, back to baking! It's zucchini season! If you have a garden and have planted zucchini, or know anyone who has, then you know how sometimes you can get a few too many zucchini. I love growing it and making both sweet and savory things, but I kind of get stuck in a rut by the end of it all. I remember a couple of summers ago when we had zucchini in every meal for a week. I think that was the week I decided to start shredding and freezing what zucchini we had left.


I was so excited when one of the first zucchini recipes I found this season was for something I had never made before. Jenn over at Eat Cake For Dinner made some zucchini cake sandwich cookies modeled after carrot cake sandwich cookies. Genius! This year my little girl planted the seeds for our zucchini, so it's fun to tell her that we are eating what she planted. And it's even better when it's for dessert!


Zucchini Cake Sandwich Cookies
Adapted from Eat Cake For Dinner
Printer Friendly Version

1 1/4 cup all-purpose flour
1/2 tsp baking soda
1/2 tsp baking powder
1/4 tsp salt
1 tsp cinnamon
pinch of nutmeg
1/2 cup butter-flavored shortening
1/2 cup light brown sugar, packed
1/4 cup + 2 tbsp granulated sugar
1 large egg
1 tsp vanilla extract
1 cup oats
1 cup grated zucchini
Cream Cheese Frosting, recipe below

Preheat oven to 350 degrees.

In a small bowl, whisk together flour, baking soda, baking powder, salt, cinnamon and nutmeg; set aside. Cream together the shortening, brown sugar, and granulated sugar until very light and fluffy. Add the egg and vanilla and mix until combined.

Add the dry ingredients to the wet ingredients and mix until just combined. Add the oats and grated zucchini and mix very well. Dough will be pretty sticky, and will spread when baking. Drop dough onto prepared baking sheet, using a small cookie scoop.

Bake for 12 minutes or until lightly browned. Cool completely.

Spread cream cheese frosting on the flat side of one cookie and top with the flat side of another cookie. Store in the refrigerator.


Cream Cheese Frosting

8 oz cream cheese (1 cube), room temperature
12 tbsp unsalted butter (1 1/2 cubes), room temperature
1/2 tsp vanilla extract
1/4 tsp almond extract
2 cups confectioners sugar, sifted

In the bowl of an electric mixer fitted with a paddle attachment, blend together the cream cheese, butter, vanilla, and almond extracts. Add the confectioners sugar and mix until smooth.

Sunday, August 21, 2011

Strawberry Muffins

In these dwindling days of summer, I was drawn in by an ad at my local grocery store. Buy one, get one free on strawberries. I bought some knowing that this might be the last sale of this kind we have before next year. I had no idea what I was going to do with them, just that I wanted to try to bake something with them.

My friend sold her house and was kind of in panic mode the night before closing. I texted her and told her I'd come over to help with the last packing and cleaning. I wanted to take something that she could feed the kids the morning of closing and not have to worry about a mess or the stress of finding something to eat. And thus was born strawberry muffins.


I googled a few different recipes, but it came down to tweaking a couple of recipes on the Joy of Baking website to get what I wanted. This recipe calls for brown sugar rather than white sugar. Using brown sugar gives it a richer flavor and color. I also used sour cream to make a more dense muffin and to add some moisture, but you could easily substitute plain yogurt, or maybe tweak the recipe and use buttermilk for a lighter texture.


All in all, I was really pleased with the muffins. I loved the extra flavor the cinnamon added, and it was so fun to eat a muffin that was different from the norm! They were exactly what I was hoping for, and I hope my friend enjoyed them on that hectic morning!


Strawberry Muffins
adapted from Joy of Baking
Printer Friendly Version

½ cup unsalted butter, melted
2 large eggs, lightly beaten
1 tsp vanilla extract
½ cup sour cream
1 ½ cups fresh strawberries, cut into small pieces
2 ¼ cups all purpose flour
¾ cup light brown sugar
1 ½ tsp baking powder
¼ tsp baking soda
1 tsp ground cinnamon
½ tsp salt

Preheat oven to 350 degrees. Line a 12 cup muffin pan with paper liners or lightly butter or spray the muffin cups with a vegetable spray.

In a small saucepan melt the butter and let cool to room temperature.

In a medium sized bowl whisk together the eggs, vanilla extract and sour cream. Add the melted butter and stir to combine.

In another large bowl combine the flour, sugar, baking powder, baking soda, cinnamon, and salt. Gently fold in the berries, making sure they are coated with flour. (This helps to prevent the berries from sinking during baking.) Add the wet ingredients to the dry ingredients and stir only until the ingredients are just combined. Do not over mix the batter or you will get tough muffins.

Divide the batter evenly among the 12 muffin cups, using an ice cream scoop. Place in the oven and bake until a tester inserted in the center of a muffin comes out clean, about 20 to 25 minutes. Transfer to a wire rack to cool.

Can be stored for a few days at room temperature.

Monday, August 15, 2011

Sinfully Sinless Tiramisu

At the beginning of July I started a '30 before 30' list. My birthday has come and gone and I accomplished 14 things on the list. Given that it was started a month before my 30th birthday, I'm happy with that, but I'm going to keep going until I do everything on that list.

One of my goals was to cook something with an ingredient I've never used. My dad was coming for a visit and I knew that he would enjoy the Sinfully Sinless Tiramisu that I found over at Mel's Kitchen Cafe. It actually called for two ingredients I had never used - ladyfingers, and rum extract. Here's a tip when you're looking for ladyfingers - I looked at 3 different stores and finally found them in the international food aisle, near the pasta.


So what do it mean by "sinfully sinless?" Well, this recipe substitutes cocoa powder and rum extract for the espresso/rum mixture and the coffee granules. So for those, including me, who abstain from coffee, this title is fitting. Now, I've never actually had tiramisu, so I can't be the best judge. But, I thought it was good. I couldn't find mascarpone cheese in any of my grocery stores (maybe I was looking in the wrong place?), so I had to use cream cheese. My dad said that it was missing the bite of the coffee granules and he could taste the cream cheese, but he enjoyed it. It was a nice, light dessert to finish off the night. So if you're looking for something different, give this a try!


Sinfully Sinless Tiramisu
from Mel's Kitchen Cafe
Printer Friendly Version
*Serves 6-8

1 ½ cups good-quality hot chocolate, made with water and using 1 ½ times the hot chocolate powder
½ teaspoon rum extract
½ tablespoon pure vanilla extract
4 large egg yolks
½ cup granulated sugar
1/8 teaspoon salt
¼ cup heavy whipping cream
8 ounces mascarpone cheese (can sub cream cheese in a pinch)
½ cup heavy whipping cream
About 36 crisp ladyfingers cookies/biscuits
1 tablespoon natural cocoa powder

Make the hot cocoa according to the instructions above – using water instead of milk and using 1 ½ the amount of hot chocolate powder you would normally use to make a cup for drinking. Allow the hot cocoa to cool while you are preparing the rest of the recipe. Once it is lukewarm, add the vanilla and imitation rum extract. Due to the high cocoa to water ratio, whisk the cocoa mixture frequently to keep the cocoa suspended.

Set a medium saucepan over medium heat and fill with about 1-2 inches water. Let it come to a simmer while you proceed with the recipe. In a medium bowl (an appropriate size to be placed on the pan that is heating), beat the egg yolks at low speed with a mixer (hand or electric) until just combined. Add the ½ cup sugar and salt and beat at medium-high speed until pale yellow, 1 1/2 to 2 minutes, scraping down the bowl with a rubber spatula once or twice. Add ¼ cup cream to the yolks and beat at medium speed until just combined, 20 to 30 seconds; scrape the bowl. Set the bowl with the yolks over the saucepan of water that has come to a simmer. Cook the egg yolk mixture, stirring constantly and scraping along the bottom and sides of the bowl with a heatproof rubber spatula, until the egg yolk mixture coats the back of a spoon, about 4 to 7 minutes. Remove the bowl from the heat and stir vigorously to cool slightly, then set aside to cool to room temperature, about 15 minutes.

Add the mascarpone cheese to the cooled mixture and beat at medium speed until no lumps remain, about a minute. Transfer the mixture to a large bowl and set aside. In the now-empty bowl (no need to clean the bowl), beat the ½ cup heavy whipping cream at medium-high speed until stiff peaks form. Using a rubber spatula, fold 1/3 of the whipped cream into the mascarpone mixture. Then gently fold in the remaining whipped cream until no white streaks remain. Set the mixture aside.

Give the hot cocoa mixture a good whisk to combine. Pour it into a shallow baking dish like a pie plate. Dip 1 ladyfinger into the hot cocoa at a time, allowing it to soak up the hot cocoa for about 1-2 seconds per side. Transfer each ladyfinger immediately to an 8-inch square baking dish. Lay the cookies side-by-side to create one even layer. You may have to trim/break the soaked cookies to fit the pan. After finishing the first layer of ladyfinger cookies, spread half of the mascarpone cream mixture evenly over the ladyfingers, spreading to the edges of the pan. Using a small fine-mesh strainer, sprinkle 1/2 tablespoon of the natural cocoa powder over the mascarpone layer.

Repeat the soaking process with the ladyfingers, creating one more layer of ladyfinger cookies over the mascarpone/cocoa layer. Spread evenly with the remaining mascarpone mixture. Dust with the final 1/2 tablespoon of natural cocoa powder. Refrigerate for at least 4 hours to chill and set. This can be made up to 1 day in advance. Cut into squares and serve.

Sunday, August 7, 2011

Thin Mint Cake

I've officially entered my 30's. Kinda cool. Kinda crazy. I had pinned this thin mint cake from i am baker months ago knowing it would be my birthday cake. I even told my husband I would make it, which I did. But he assembled and frosted it and did a beautiful job, telling me that he tried to make it blog-worthy.


A few notes about this cake. You use a boxed cake mix. You add banana and cinnamon.

Here were my initial thoughts. I could taste the banana and cinnamon because I knew it was in there. My husband, who has a very sophisticated palate, could not taste them until I had told him they were in there. The texture was very much like a boxed cake mix, just a little more moist because of the banana.


Texture aside, I really liked this cake. I go crazy for anything chocolate mint, so it is a perfect match for me. Next time I make it I'm going to make a chocolate cake from scratch and add in the peppermint extract, cinnamon, and banana. I used a different buttercream recipe than i am baker's, and thought it was good. Really easy, too.


Thin Mint Cake
from i am baker
Printer Friendly Version

1 box chocolate cake mix
1 cup water
2 sticks butter (softened)
4 eggs
1/2 ripe banana, mashed
1 tbsp. cinnamon
1 tbsp. + 1/4 tsp peppermint extract
1/3 cup extra virgin olive oil

Heat oven to 325 degrees.

Combine all ingredients in a mixer on low for thirty seconds, then increase speed to medium and mix until just combined.

Pour into prepared pans (I used two 8 in pans) and bake for 30-40 minutes or until an inserted toothpick comes out clean.


Quick Vanilla Buttercream Frosting
from Gale Gand

3 cups confectioners' sugar
1 cup butter
1 teaspoon vanilla extract
1 to 2 tablespoons whipping cream

In a standing mixer fitted with a whisk, mix together sugar and butter. Mix on low speed until well blended and then increase speed to medium and beat for another 3 minutes.

Add vanilla and cream and continue to beat on medium speed for 1 minute more, adding more cream if needed for spreading consistency.

Sunday, July 31, 2011

Oreo Stuffed Peanut Butter Cookies

Yes, it's another Oreo recipe. You'd think I live and breathe Oreos in this home, but this one wasn't my fault. You see, it all started when my husband walked in the door with a grocery bag full of Peanut Butter Oreos, and Lemon cookies. Two packaged cookies. What am I, the joyful baker, supposed to think?

Well, what I thought was that I could turn those Oreos into something really good. And I thought I was a genius for tweaking Picky Palate's Oreo Stuffed Chocolate Chip cookies and making them peanut butter. But then I decided to google it and found that I wasn't as much of a genius as I originally thought. Runs With Spatulas had already made these. Been there, done that. And she even had the most awesome slideshow of a cookie eating an oreo I've ever seen. OK, it might be the only slideshow I've ever seen of a cookie eating an oreo, but still. It was awesome.


Knowing I wasn't a genius didn't stop me from making these cookies. And enjoying them. A lot.


Oreo Stuffed Peanut Butter Cookies
Adapted from Picky Palate, Runs With Spatulas, and All Recipes
Printer Friendly Version

1 cup unsalted butter
1 cup crunchy peanut butter
1 cup white sugar
1 cup packed brown sugar
2 eggs
2 1/2 cups all-purpose flour
1 teaspoon baking powder
1/2 teaspoon salt
1 1/2 teaspoons baking soda
1 package Peanut Butter Oreo cookies

Preheat the oven to 375° F. In a large mixing bowl, cream together the butter, peanut butter and sugars until smooth. Add the eggs, one at a time until combined.

In a separate bowl, sift together flour, baking powder, baking soda, and salt. Mix into the wet ingredients slowly until just combined. Put batter in the refrigerator for 1 hour.

To assemble the cookies, take one tablespoon of cookie dough and place on the top of an Oreo cookie. Take another tablespoon of dough and place on the bottom of the Oreo cookie. Form the dough around the Oreo and seal the edges together. Flatten each ball with a fork, making a criss-cross pattern.

Bake the cookies for 10-12 minutes or until the cookies begin to brown around the edges. Do not over-bake.

Sunday, July 24, 2011

Strawberry Cream Puff Cake

Strawberries and cream puffs? Um, yes! I really enjoyed making this cake I found over at Mel's Kitchen Cafe. Maybe because it was something I had never made before, or because I knew both my husband and I would love it, or because it just sounded so fresh and light and summery. And it was, all of the above.


I love how the baked shell puffs out and has so much texture. And the cream cheese filling is so light and creamy. Top it with strawberries and you are sure to impress anyone! It's a beautiful cake, and really pretty easy to make. Next time I make it, I may have to try a combination of different berries. Yum!


Strawberry Cream Puff Cake
from Mel's Kitchen Cafe
Printer Friendly Version

Cream Puff Base
5 tablespoons butter
2/3 cup water
1 tablespoon sugar
2/3 cup flour
3 eggs

Cream Cheese Mixture
4 ounces cream cheese, softened
1 teaspoon fresh orange zest
1/2 teaspoon vanilla
1 cup heavy whipping cream
2/3 cup powdered sugar

2 cups strawberries
1 tsp sugar

For the cream puff layer, preheat the oven to 375 degrees. Bring the butter, water and sugar to a boil in a medium saucepan. Add the flour all at once and stir quickly until the mixture pulls away from the sides of the pan. Remove the pan from the heat and stir the mixture until smooth. Let cool for 5 minutes. Add the eggs one at a time and beat until the mixture is shiny with a satiny sheen. Don’t overbeat.

Lightly grease the bottom and sides of a 9-inch springform pan (or a 9-inch circle cake pan if you don't have a springform). Using an offset spatula, spread the mixture on the bottom and one inch up the sides of the prepared pan. Bake for 25 minutes. Remove from the oven and prick pastry with a toothpick 10-12 times. Return to the oven and bake 5-10 minutes more until golden brown but not overbaked (you can insert a toothpick into the center and if it comes out with sticky dough, it still needs longer in the oven). Cool completely.

For the cream cheese mixture, beat the cream cheese until smooth. Gradually add the powdered sugar and beat with the cream cheese until mixture is smooth and light. Add the remaining ingredients and beat until stiff peaks form. Spread onto the cooled cream puff shell.

Mix sliced strawberries with sugar, and place on top of the cake.

Tuesday, July 19, 2011

Oreo Cookies and Cream Cheesecakes

My favorite dessert is cheesecake. Hands down. I always have 4 bars of cream cheese in my fridge, just waiting to be made into something delicious. And when we have girls' nights at the Cheesecake Factory because it's the only place nearby that stays open past 11, it never even crosses my mind to NOT order a piece.

When I came across this recipe at La Mia Vita Dolce (her pictures are amazing), I knew I had to make it. The crust is absolutely genius - you use a whole Oreo and plop it down into the cupcake liner. How easy is that?!


I made these to serve at a baby shower, and everyone loved them. Mind you, they looked much prettier at the shower. I took these pictures before I left, but dressed them up with whipped cream and a quarter of an oreo once I got to the shower. So just imagine them prettier, for me.


Oreo Cookies and Cream Cheesecakes
from Martha Stewart's Cupcakes via La Mia Vita Dolce
Printer Friendly Version
Makes 30

42 Oreo, cream-filled chocolate sandwich cookies, 30 left whole and 12 coarsely chopped
2 pounds cream cheese, room temperature
1 cup sugar
1 teaspoon pure vanilla extract
4 large eggs, room temperature, lightly beaten
1 cup sour cream
Pinch of salt

Preheat oven to 275° F. Line standard muffin tins with paper liners. Place 1 whole Oreo cookie in the bottom of each lined muffin cup.

In the bowl of a stand mixer, fitted with the paddle attachment, beat cream cheese on medium-high speed until smooth, scraping down sides of the bowl as needed. Gradually add the sugar, and beat until combined. Beat in the vanilla.

Drizzle in eggs, a little at a time, beating to combine and scraping down sides of bowl as needed. Add in sour cream and salt, beat to combine. Using a large spatula, fold in the chopped Oreo cookies.

Divide batter evenly among the cookie-filled muffin cups, fill each cup almost to the top. Bake, rotating muffin tins halfway through, until the filling is set, about 22 to 28 minutes. Transfer the muffins tins to a wire rack to cool completely. Refrigerate (in the muffin tins) at least 4 hours (or overnight). Remove from tins just before serving.

Monday, July 11, 2011

Chocolate-Coconut Bars

It's been awhile since I made a recipe from Martha. Do you all refer to her as Martha? I mean, we are BFF's (I've been to her show twice and she waved at me), but I'm guessing that others do it as well.

I pinned this recipe a couple of weeks ago, and I've been craving it ever since. I never had all of the ingredients on hand to make it, though. So a few nights ago when my husband called on his way home from a church activity and asked if I needed anything, I said, "yes! pecans!" And so the next morning my daughter and I got to work.


This is the perfect dessert to make with your kids! We crushed some graham crackers (well, I crushed, she ate). We sprinkled chocolate chips and pecans (and she ate). We poured sweetened condensed milk and sprinkled some coconut. And in no time at all we had a delicious, rich, easy treat!


Chocolate-Coconut Bars
from Martha Stewart
Printer Friendly Version

3 cups finely ground cookies (12 ounces), such as graham crackers or chocolate wafers, or a combination
1/4 cup sugar
3/4 cup (1 1/2 sticks) unsalted butter, melted
1 cup pecan pieces
1 cup semisweet chocolate chips or chunks
1 can (14 ounces) sweetened condensed milk
1 1/2 cups sweetened shredded coconut

Preheat oven to 375 degrees. Lightly splash a 15-by-10-inch rimmed baking sheet evenly with water, then line with parchment paper.

In a large bowl, stir together cookie crumbs, sugar, and butter until combined. Evenly press onto bottom and up sides of prepared baking sheet. Bake, rotating halfway through, until firm, about 10 minutes. Transfer to a wire rack; cool, about 20 minutes.

Sprinkle cooled crust evenly with pecans and chocolate. Pour condensed milk over the top, spreading to cover completely (do not let it drip over the edges). Sprinkle with coconut.

Bake until coconut is toasted, 10 to 15 minutes. Transfer to rack; cool completely. Trim edges, if desired, and cut into equal-size bars.

Monday, July 4, 2011

Happy 4th of July!

American Flag Rice Krispie Treats

Sunday, June 26, 2011

Banana Cream Pie

After I had my baby, my friend brought over her family's favorite dessert - Banana Pudding. I think my husband and I ate the entire pan that night. It had layers of Pepperidge Farm Chessman cookies, bananas, and was so rich, creamy and delicious. I emailed her and said I wanted the recipe, but I couldn't wait for her to respond. So I started a search for banana pudding and found Paula Dean's Not Yo' Mama's Banana Pudding. I knew I had found the recipe.

My husband requested a banana cream pie for Father's Day. First off, he LOVES banana cream pie. Second, he wanted something easy so that I wasn't spending the whole day in the kitchen slaving away. I searched for recipes but all of the ones that appealed to me involved turning on the oven and stove.


In the end I decided to use a store-bought Nilla wafer crust (gasp!) and filled it with bananas and the pudding from Paula Dean's recipe. My husband guessed right away what I had done. There is no mistaking this pudding. It's a combination of french vanilla pudding, cream cheese, and whipped topping. A-MAZING. And it is so easy. Some may call it cheating, but I just call it good eats.


Banana Cream Pie
Adapted from Paula Dean's Not Yo' Mama's Banana Pudding
Printer Friendly Version

1 Nilla wafer crust
3 to 4 bananas, sliced
1 cup milk
1 (3.4 oz) box instant French vanilla pudding
1/2 pkg (4 oz) cream cheese, softened
1/2 can (7 oz) sweetened condensed milk
1/2 container (6 oz) frozen whipped topping thawed, or equal amount sweetened whipped cream

Layer the sliced bananas on the bottom of the crust.

In a bowl, combine the milk and pudding mix and blend well using a handheld electric mixer. Using another bowl, combine the cream cheese and condensed milk together and mix until smooth. Fold the whipped topping into the cream cheese mixture. Add the cream cheese mixture to the pudding mixture and stir until well blended. Pour the mixture over the bananas.

Refrigerate until ready to serve, at least 2 hours.

Saturday, June 18, 2011

Key Lime Bars

Key limes will always remind me of my 2nd anniversary. We went on a cruise to the Bahamas, and one of our stops was Key West, Florida. They had these touristy shops with everything key lime - so of course I indulged and bought things like key lime taffy and key lime fudge. Me and key limes. We're tight.

I've had my eye on Nellie and Joe's Key West lime juice for years but had never bought it. Until a week ago. I didn't have a reason for buying it. I wanted to have it, just in case.

Well, the awesome people at America's Test Kitchen must have known I was in the market for a recipe to use it on, so they sent me a link to their Key Lime Bars. Granted, probably a million other people got this link via their newsletter, but I still felt like it was directed at me. And I was co-hosting a baby shower that needed some serious delicious desserts. Perfect.


These bars tasted so fresh and creamy! I loved the addition of cream cheese to the filling. There was just the right amount so that it didn't overpower the lime flavor, and the toasted coconut added such great texture. (You'll just have to imagine my pictures with toasted coconut because I took these pictures before it was added). The perfect summer treat!


Key Lime Bars
Adapted from Cook's Illustrated and Joy of Baking
Printer Friendly Version

Crust
1 1/4 c graham cracker crumbs
2 tbsp sugar
5 tbsp unsalted butter, melted

Filling
2 oz cream cheese, room temperature
1 tbsp grated lime zest
pinch table salt
1 (14-ounce) can sweetened condensed milk
1 egg yolk
1/2 c fresh lime juice, either Key lime or regular

Garnish (optional)
3/4 c sweetened shredded coconut , toasted until golden and crisp

Adjust oven rack to middle position and heat oven to 325 degrees. Cut about 12-inch length extra-wide heavy-duty foil; fold cut edges back to form 7 1/2-inch width. With folded sides facing down, fit foil securely into bottom and up sides of 8-inch-square baking pan, allowing excess to overhang pan sides. Spray foil with nonstick cooking spray.

To make the crust: Mix together the graham cracker crumbs, sugar, and melted butter. Press onto the bottom and up the sides of the prepared pan. Bake for about 10 minutes or until set and lightly browned. Remove from oven and place on wire rack to cool while you make the filling

To make the filling: While crust cools, in medium bowl, stir cream cheese, zest, and salt with rubber spatula until softened, creamy, and thoroughly combined. Add sweetened condensed milk and whisk vigorously until incorporated and no lumps of cream cheese remain; whisk in egg yolk. Add lime juice and whisk gently until incorporated (mixture will thicken slightly).

To assemble and bake: Pour filling into crust; spread to corners and smooth surface with rubber spatula. Bake until set and edges begin to pull away slightly from sides, 15 to 20 minutes. Cool on wire rack to room temperature, 1 to 1 1/2 hours. Cover with foil and refrigerate until thoroughly chilled, at least 2 hours.

Loosen edges with paring knife and lift bars from baking pan using foil extensions; cut bars into 16 squares. Sprinkle with toasted coconut, if using, and serve. (Leftovers can be refrigerated up to 2 days; crust will soften slightly. Let bars stand at room temperature about 15 minutes before serving.)

Monday, June 13, 2011

Apple Blackberry Crisp

In an effort to eat more healthy, I went to the store and bought 4 pounds of strawberries, 4 pounds of grapes, and 18 ounces of blackberries. I was pretty excited to have a bowl of fresh fruit for my breakfast, and the strawberries and grapes tasted so good together. And then I bit into a blackberry. Yow! It was so tart my face scrunched up and I couldn't even finish the berry.


I immediately started thinking of things I could make with my blackberries, and I decided on apple blackberry crisp. I guess this means that my quest to eat healthy was short lived.

I have a go-to recipe for apple crisp that my good friend gave me, but I was concerned about the blackberries and what they might need for balance in the crisp. So I found a recipe for apple blackberry crisp online, and then combined the two (because I LOVE the crisp topping from my friends' recipe) and it was absolutely delicious!

So if you're like me, and you get a batch of tart blackberries, whip up some apple blackberry crisp. Or better yet, go and buy some blackberries just for this crisp. And serve it with a big scoop of vanilla ice cream. You won't be sorry.


Apple Blackberry Crisp
Adapted from Fine Cooking and Crystal Wilde's recipe

Topping
1 cup flour
1 cup quick oats
1 cup brown sugar
1/4 tsp baking soda
1/4 tsp baking powder
1/4 tsp salt
1/2 cup melted butter

Filling
6 cups sliced apples (I used Granny Smith but you could mix things up a little)
2 cups blackberries
1/2 cup sugar
1 tbsp cornstarch
1 tbsp lemon juice
2 tbsp butter

Heat the oven to 350 degrees F.

Mix together the dry ingredients for the topping, and then stir in the melted butter. Set aside.

Put the apples and blackberries into a large bowl and stir in the sugar. In a small dish, dissolve the cornstarch into the lemon juice and gently toss the mixture with the fruit.

Pour the fruit mixture into a 9x13" glass or ceramic baking dish and dot with butter. Top the fruit with the topping and bake for approximately 45 minutes until the fruit is tender when pierced with a knife, the topping is crisp, and the juices are bubbling. Let cool for 20 to 30 minutes. Serve warm.

Saturday, May 21, 2011

Brownie Chunk Chocolate Chip Cookies

I was scrolling through my reader yesterday when I saw this recipe from Picky Palate. I didn’t have a pan of leftover brownies, but I wasn’t going to let that stop me from making these cookies. I immediately went into the kitchen and threw a box of brownie mix into the oven.


I let them cool, and started making the dough. As I put the brownie chunks into the bowl and they started to disintegrate into the cookie dough, I realized that I should have made the cake-like brownies, instead of the fudge brownies. Note to self: Make sturdier brownies for these cookies, because the cookies that have an actual chunk of brownie are the best.


I’m kind of into the salty-sweet combo lately, so when I saw that the recipe only called for a ½ tsp of salt, I decided to up it to 1 tsp. I’m really glad I did. The saltiness came through perfectly, and I thought these were a fun variation on chocolate chip cookies.


Brownie Chunk and Chocolate Chip Cookies
Adapted from Picky Palate

1 cup (2 sticks) unsalted butter, softened
3/4 cup granulated sugar
3/4 cup packed light brown sugar
2 large eggs
1 tablespoon vanilla
3 cups all-purpose flour
1 teaspoon baking soda
1 teaspoon kosher salt
1 cup chocolate chips
2 cups cubed prepared brownies

Preheat oven to 350 degrees F and line a large baking sheet with parchment or silpat liner.

Place butter and sugars into the bowl of a stand or electric mixer, beating until light and fluffy. Add eggs and vanilla, beating until well combined.

Place flour, baking soda, and salt into a large bowl, mixing to combine. Slowly add dry ingredients to wet ingredients along with chocolate chips and brownie chunks until just combined.

Using a medium cookie scoop, scoop dough onto prepared baking sheet about 1-inch apart. Bake for 9 to 11 minutes until cooked through. Let cool for 5 minutes before transferring to cooling rack.

Makes 3 dozen cookies

Monday, May 16, 2011

Cream Cheese Coffee Cake

The day before Mother’s Day, I told my husband that I wanted to make my own breakfast for Mother’s Day (don’t worry, I made it Saturday night so I wasn’t slaving away on the actual day). He thought that was a pretty awesome idea, and my daughter thought it was pretty neat that we got to have cake for breakfast.

I found this recipe in my email from America’s Test Kitchen, and as anyone could predict, I was immediately drawn to this recipe. Cream cheese in sweetened form? Um, yes.


This cake was extremely moist and dense, and the cream cheese swirl was delicious. I loved the hint of lemon that was both in the cream cheese swirl, and the sugar-almond topping. My swirl was less than pretty, but I’m sure with practice it’ll get better. Because I do plan on making this again. And again. And again.


Cream Cheese Coffee Cake
From Cooks' Illustrated
Printer Friendly Version

Makes one 10-inch cake, serving 12 to 16

Lemon Sugar-Almond Topping
1/4 cup sugar
1 1/2 teaspoons finely grated zest from 1 lemon
1/2 cup sliced almonds

Cake
2 1/4 cups (11 1/4 ounces) unbleached all-purpose flour
1 1/8 teaspoons baking powder
1 1/8 teaspoons baking soda
1 teaspoon table salt
10 tablespoons (1 stick plus 2 tablespoons) unsalted butter, softened but still cool
1 cup plus 7 tablespoons sugar
1 tablespoon finely grated zest plus 4 teaspoons juice from 1 to 2 lemons
4 large eggs
5 teaspoons vanilla extract
1 1/4 cups sour cream
8 ounces cream cheese, softened


FOR THE TOPPING: Adjust oven rack to middle position and heat oven to 350 degrees. Stir together sugar and lemon zest in small bowl until combined and sugar is moistened. Stir in almonds; set aside.

FOR THE CAKE: Spray 10-inch tube pan with nonstick cooking spray. Whisk flour, baking powder, baking soda, and salt together in medium bowl; set aside. In stand mixer fitted with paddle attachment, beat butter, 1 cup plus 2 tablespoons sugar, and lemon zest at medium speed until light and fluffy, about 3 minutes, scraping down sides and bottom of bowl with rubber spatula. Add eggs 1 at a time, beating well after each addition, about 20 seconds, and scraping down beater and sides of bowl as necessary. Add 4 teaspoons vanilla and mix to combine. Reduce speed to low and add one-third flour mixture, followed by half of sour cream, mixing until incorporated after each addition, 5 to 10 seconds. Repeat, using half of remaining flour mixture and all of remaining sour cream. Scrape bowl and add remaining flour mixture; mix at low speed until batter is thoroughly combined, about 10 seconds. Remove bowl from mixer and fold batter once or twice with rubber spatula to incorporate any remaining flour.

Reserve 1¼ cups batter and set aside. Spoon remaining batter into prepared pan and smooth top. Return now-empty bowl to mixer and beat cream cheese, remaining 5 tablespoons sugar, lemon juice, and remaining teaspoon vanilla on medium speed until smooth and slightly lightened, about 1 minute. Add ¼ cup reserved batter and mix until incorporated. Spoon cheese filling mixture evenly over batter, keeping filling about 1 inch from edges of pan; smooth top. Spread remaining cup reserved batter over filling and smooth top. With butter knife or offset spatula, gently swirl filling into batter using figure-8 motion, being careful to not drag filling to bottom or edges of pan. Firmly tap pan on counter 2 or 3 times to dislodge any bubbles. Sprinkle lemon sugar-almond topping evenly over batter and gently press into batter to adhere.

Bake until top is golden and just firm, and long skewer inserted into cake comes out clean (skewer will be wet if inserted into cheese filling), 45 to 50 minutes. Remove pan from oven and firmly tap on counter 2 or 3 times (top of cake may sink slightly). Cool cake in pan on wire rack 1 hour. Gently invert cake onto rimmed baking sheet (cake will be topping-side down); remove tube pan, place wire rack on top of cake, and invert cake sugar-side up. Cool to room temperature, about 1½ hours. Cut into slices and serve.

Leftovers should be stored in the refrigerator, covered tightly with plastic wrap. For optimal texture, allow the cake to return to room temperature before serving.


Tempt my Tummy Tuesdays
Home Sweet HomeIt's a KeeperCatch a Glimpse ButtonTip Junkie handmade projects lil luna link party button
Somewhat SimpleHookingupwithHoH

”Photobucket”