Monday, November 8, 2010

Banana Crumb Muffins

My husband and I have one of the coolest kitchen tools. We came upon it by chance, and I had no idea what it was at the time. We were visiting his extended family in Wyoming and his cousin just happened to be home. She was going to college in Alaska and had brought home a gift for her mom. The gift was an ulu.


We were in the right place at the right time, because Alex's aunt already owned an ulu and the gift was just sitting there without a home. Alex's cousin asked us if we wanted it, and we accepted it happily. I'll be honest. It just looks cool. It has quickly become my go-to tool for chopping things, particularly nuts.


Having a 2-year old has made bananas become a staple in the home. I sometimes will buy the biggest bunch I can find so that I will have a few leftover to make something yummy. I decided to branch out from my regular banana bread and found a banana crumb muffin recipe.

I don't know what it is about this recipe, but my hunch is that it's the crumb topping that makes it so delicious. My daughter loved them, my husband loved them, and I loved them. It was a winner all around. The recipe didn't call for nuts, but I always add walnuts to anything baked with banana.


Banana Crumb Muffins
Adapted from recipe by Lisa Kreft

1 1/2 cups all-purpose flour
1 teaspoon baking soda
1 teaspoon baking powder
1/2 teaspoon salt
3 bananas, mashed
3/4 cup white sugar
1 egg, lightly beaten
1/3 cup butter, melted
1/2 cup walnuts, chopped (optional)

1/3 cup packed brown sugar
2 tablespoons all-purpose flour
1/8 teaspoon ground cinnamon
1 tablespoon butter


Preheat oven to 375 degrees F (190 degrees C). Lightly grease 10 muffin cups, or line with muffin papers.


In a large bowl, mix together 1 1/2 cups flour, baking soda, baking powder and salt. In another bowl, beat together bananas, sugar, egg and melted butter. Stir the banana mixture into the flour mixture just until moistened. Spoon batter into prepared muffin cups.

In a small bowl, mix together brown sugar, 2 tablespoons flour and cinnamon. Cut in 1 tablespoon butter until mixture resembles coarse cornmeal. Sprinkle topping over muffins.

Bake in preheated oven for 18 to 20 minutes, until a toothpick inserted into center of a muffin comes out clean.

Tres Leches Cake

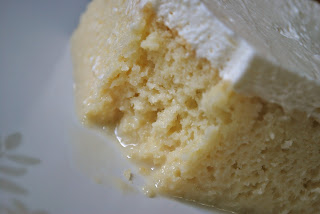
I grew up in an area where you would find a Mexican restaurant on every other block, and it was GOOD food. So I'm not quite sure why I never had tried tres leches cake before. Maybe because I'm too cheap to order dessert in a restaurant. Or maybe it just sounded too fancy for me.

Three milk cake. Have you ever tried it? It's a sponge cake, and once you pour the three milks on it becomes very moist. Can you just see the liquid goodness coming out of that cake? It's also very sweet and rich. I could only handle one piece at a time. At three different times during the day.

Tres Leches Cake

from Alton Brown

For the cake:

Vegetable oil
6 3/4 ounces cake flour, plus extra for pan
 
1 tsp baking powder
1/2 teaspoon kosher salt

4 ounces unsalted butter, room temperature

8 ounces sugar

5 whole eggs

1 1/2 teaspoons vanilla extract
For the glaze:
1 (12-ounce) can evaporated milk
1 (14-ounce) can sweetened condensed milk

1 cup half-and-half


For the topping:

2 cups heavy cream

8 ounces sugar
1 teaspoon vanilla extract


Directions for the cake:

Preheat the oven to 350 degrees F. Lightly oil and flour a 13 by 9-inch metal pan and set aside.
Whisk together the cake flour, baking powder and salt in a medium mixing bowl and set aside.
Place the butter into the bowl of a stand mixer. Using the paddle attachment, beat on medium speed until fluffy, approximately 1 minute. Decrease the speed to low and with the mixer still running, gradually add the sugar over 1 minute. Stop to scrape down the sides of the bowl, if necessary. Add the eggs, 1 at a time, and mix to thoroughly combine. Add the vanilla extract and mix to combine. Add the flour mixture to the batter in 3 batches and mix just until combined. Transfer the batter to the prepared pan and spread evenly. This will appear to be a very small amount of batter. Bake on the middle rack of the oven for 20 to 25 minutes or until the cake is lightly golden and reaches an internal temperature of 200 degrees F.
Remove the cake pan to a cooling rack and allow to cool for 30 minutes. Poke the top of the cake all over with a skewer or fork. Allow the cake to cool completely and then prepare the glaze.
Directions for the glaze:
Whisk together the evaporated milk, sweetened condensed milk and the half-and-half in a 1-quart measuring cup. Once combined, pour the glaze over the cake. Refrigerate the cake overnight.
Directions for the topping:
Place the heavy cream, sugar and vanilla into the bowl of a stand mixer. Using the whisk attachment, whisk together on low until stiff peaks are formed. Change to medium speed and whisk until thick. Spread the topping over the cake and allow to chill in the refrigerator until ready to serve.
PS - I hear Pioneer Woman has a good tres leches cake recipe as well. I may just have to try it out...

Thursday, September 16, 2010

Gingerbread with Cream Cheese Frosting

I don't normally talk to myself. At least I don't think I do. But today I found myself in the kitchen, alone, taking a bite of gingerbread with cream cheese frosting and saying, "Wow, that's good."


I wanted to make this recipe a few days ago when we had some people over for dinner, but I didn't have enough cream cheese for the frosting so I put it on hold. Well, I still didn't have enough cream cheese last night, but I just had to make the gingerbread. My husband and I ate it as we normally do, with a dollop of whipped cream on top. I added some fresh nectarine slices, since I had them. We also have been known to eat this gingerbread with bananas or peaches. It's a very versatile cake with rich spices and a dense, moist texture.


But let me tell you, nothing could have prepared me for the combination of gingerbread and cream cheese frosting. It was like fireworks went off in my head. The smooth creamy frosting balanced the intense flavors of the gingerbread perfectly, and I found myself wanting more. And so, as soon as I was done taking pictures of this beautiful cake, I dug in to my second piece. And I'm sure I'll have a third before the day is over.

Gingerbread
from Lion House Recipes

1/2 cup sugar
1/2 cup butter
1 egg, well beaten
1 cup molasses
1/2 teaspoon salt
2 1/2 cups sifted flour
1 1/2 teaspoons baking soda
1 teaspoon cinnamon
1 teaspoon ginger
1/2 teaspoon powdered cloves
1 cup very hot water

Cream sugar and butter well. Add eggs and molasses. Beat well. Sift dry ingredients together and add to creamed mixture. Add hot water and beat until smooth (batter will be very thin). Pour into a well-greased 9x13 inch baking pan. Bake in a 350-degree oven for 35-40 minutes, or until cake tests done.

*As stated above, you can serve this with whipped cream. Peaches, nectarines, and bananas make nice toppings.


Cream Cheese Frosting

6 oz cream cheese, room temperature
1/2 cup butter, room temperature
1/2 teaspoon vanilla extract
1/4 teaspoon almond extract
2 cups powdered sugar

Mix cream cheese, butter, vanilla, and almond extracts together until smooth. Add powdered sugar slowly until well combined and a smooth, spreadable consistency.

Monday, September 13, 2010

Fall : Pumpkin

Every fall, right around September, my pumpkin craze hits. My husband knows it's coming (and he's usually not too excited about it). It always has. I want everything pumpkin - pumpkin pie, pumpkin bread, pumpkin cookies.


I've mentioned this before, but I haven't always had the best of luck baking with pumpkin. I don't know what it is. More often than not, my results are a gooey mess. And it makes me want to use the ingredient even more. It's my curse.

My daughter and I went on a walk the other day, and walked right by the local bakery. Naturally I had to stop in. They had a big sign advertising that they were now serving pumpkin muffins, so that's what I ordered. The muffin was full of pumpkin flavor, dense, moist, with the unique addition of walnuts. I was a fan.

Friday morning rolled around and I said to my husband, "I want to bake today." And I did. I turned to smitten kitchen for a pumpkin muffin recipe, hoping they would resemble that muffin from the bakery.


First, I need to mention that my pumpkin muffins turned out! I was extremely pleased with that fact. I made half of the muffins plain, and added walnuts to the other half. I'm really kind of digging the walnuts in the muffin. It's a pleasant combo.


Second, I need to mention that my husband actually liked these muffins. And he admitted it to me. He's not really a pumpkin fan, you see, so this was big.

If you're looking for an easy fall recipe, try this one. It was delicious and moist. And they freeze well.


Pumpkin Muffins
Adapted from the American club, in Kohler, Wisconsin via Gourmet Magazine

1 1/2 cups all-purpose flour
1 teaspoon baking powder
1 cup canned solid-pack pumpkin (from a 15 ounce can)
1/3 cup vegetable oil
2 large eggs
1 teaspoon pumpkin-pie spice
1 1/4 cups plus 1 tablespoon sugar
1/2 teaspoon baking soda
1/2 teaspoon salt
1 teaspoon cinnamon
1/2 cup chopped walnuts (optional)

Put oven in middle position and preheat oven to 350°F. Put liners in muffin cups.

Whisk together pumpkin, oil, eggs, pumpkin pie spice, 1 1/4 cups sugar, baking soda, and salt in a large bowl until smooth, then whisk in flour mixture until just combined. Add walnuts in using.

Stir together cinnamon and remaining 1 tablespoon sugar in another bowl.

Divide batter among muffin cups (each should be about three-fourths full), then sprinkle tops with cinnamon-sugar mixture. Bake until puffed and golden brown and wooden pick or skewer inserted into the center of a muffin comes out clean, 25 to 30 minutes.

Cool in pan on a rack five minutes, then transfer muffins from pan to rack and cool to warm or room temperature.

Thursday, September 9, 2010

MIA

Yes, I've been gone a long time. For some reason, I didn't have much motivation for blogging this summer. I did bake, but I didn't take many pictures. Here are just a few highlights I enjoyed:

Open-Faced Fresh Blueberry Pie

Photo courtesy of
The Kitchen Sink Recipes

Levain Bakery Copycat Chocolate Chip Walnut Cookie


Fresh Peaches 'n Cream Pie

Photo courtesy of
The Crafting Chicks

Now that it's fall, I'm feeling the motivation to get back on schedule and blog again. I've got a couple of muffin recipes coming up that I have enjoyed, so stay tuned!

Wednesday, April 28, 2010

German Apple Pancakes

If my husband and I ever open a B&B, I know what one of our dishes will be. Have you ever had German Apple Pancakes? My friend, Teresa, over at A Blog About Food posted a recipe for some German Apple Pancakes that they made on Easter Morning. They. Are. Divine.


Now, I have had just plain German pancakes, and I liked them. But I had no idea you could add a few things and make it taste this amazing. First off, you use half and half. Awesome. Second, you caramelize the apples in a combination of butter, brown sugar, and cinnamon. Even better. To top if off, you give it a little dusting of powdered sugar. Oh yeah.

This is now my go-to recipe for any special occasion where breakfast is served. Or really, any day when breakfast is served. It's that good.


German Apple Pancake
from America's Test Kitchen

1/2 cup all-purpose flour
1 tablespoon granulated sugar
1/2 teaspoon salt
2 large eggs
2/3 cup half and half
1 teaspoon vanilla extract
2 tablespoons unsalted butter
1 1/4 pounds apples (3-4) quartered, peeled and sliced 1/2 inch thick
1/4 cup packed light or dark brown sugar
1/4 teaspoon cinnamon
1 teaspoon fresh lemon juice
confectioner's sugar

Adjust an oven rack to the upper-middle position and heat the oven to 500 degrees. Whisk together the flour, granulated sugar, and salt in a large bowl. In another bowl, whisk together the eggs, half and half and vanilla. Whisk the wet ingredients into the dry ingredients until no lumps remain.

Melt the butter in 10-inch ovenproof nonstick skillet over medium-high heat. Add the apples, brown sugar and cinnamon and cook until the apples are golden brown, about 10 minutes. Off the heat, stir in the lemon juice.

Quickly pour the batter around the edge of the skillet, then over the apples. Place the skillet in the oven and immediately reduce the oven temperature to 425 degrees. Bake until the pancake has risen above the edges of the skillet and is brown, about 18 minutes. Loosen the pancake edges from the hot skillet with a spatula and invert the pancake onto a large plate or serving platter. Dust with confectioners sugar, and cut into wedges before serving.

Tuesday, April 20, 2010

Tips for perfect cookies

I'm sitting here eating a 2-day old chocolate chip cookie. I'll let you take a guess as to whether or not it's still chewy and moist, or crunchy and dry. I'll let you know at the end of this post...


I've heard a lot of people say that they just can't make good cookies. I have such a hard time comprehending this! Now, don't get me wrong, I have had some cookie batches come out horribly wrong and threw them immediately into the trash. But for the most part the cookies I make come out as they should and taste delicious.

I thought I'd give a few simple tips to help make your baking experience better, and I'll throw in a recipe for some amazing chocolate chip cookies, too.

1. Follow the recipe! Sounds simple, right? I'm amazed at how many people "experiment" or don't measure out ingredients when baking. Please, for my sake, follow the recipe. At least the first time you make it.

2. Use a cookie scoop! A common thing I hear when I make cookies for other people is, "How do you get them all the same size and shape?" I wish I could say it was my talent for pulling the exact same amount of dough out of the bowl every time. But it's not. I am a huge fan of cookie scoops. They make your life so much easier (and cleaner). And they make perfectly round cookies.

3. Use a silicone baking mat or parchment paper! I HATED when my cookies used to stick to the baking sheet. I would have to use a heavy duty metal spatula to try to scrape them off, and they'd come out looking all battered and scarred. And then, a beautiful thing happened. Silicone. I never bake cookies without using my silicone baking mat or parchment paper (parchment is silicone coated paper).

4. Underbake! This is key to making chewy, moist cookies. I understand that there are times when you will want a crunchy cookie. But I think most people enjoy that chewy texture. When you're going to check on the cookies, you'll want them to look slightly underdone in the center.

That's it! Now go and make some perfect cookies and bring some over to me! Oh, and my 2-day old cookie? Chewy, moist, and delicious!


Chocolate Chip Cookies
Adapted from Jacques Torres, courtesy of The New York Times
Time: 45 minutes, plus at least 24 hours' chilling

2 cups minus 2 tablespoons (8 1/2 ounces) cake flour
1 2/3 cups (8 1/2 ounces) bread flour
1 1/4 teaspoons baking soda
1 1/2 teaspoons baking powder
1 1/2 teaspoons coarse salt
2 1/2 sticks (1 1/4 cups) unsalted butter
1 1/4 cups (10 ounces) light brown sugar
1 cup plus 2 tablespoons (8 ounces) granulated sugar
2 large eggs
2 teaspoons natural vanilla extract
1 1/2 cups semi-sweet chocolate chips
Sea salt

1. Sift flours, baking soda, baking powder and salt into a bowl. Set aside.

2. Using a mixer fitted with paddle attachment, cream butter and sugars together until very light, about 5 minutes. Add eggs, one at a time, mixing well after each addition. Stir in the vanilla. Reduce speed to low, add dry ingredients and mix until just combined, 5 to 10 seconds. Drop chocolate chips in and incorporate them without breaking them. Press plastic wrap against dough and refrigerate for 24 to 36 hours. Dough may be used in batches, and can be refrigerated for up to 72 hours.

3. When ready to bake, preheat oven to 350 degrees. Line a baking sheet with parchment paper or a nonstick baking mat. Set aside.

4. Scoop 1 tbsp of dough onto baking sheet. Sprinkle lightly with sea salt and bake until golden brown but still soft, 12 to 14 minutes. Transfer sheet to a wire rack for 10 minutes, then slip cookies onto another rack to cool a bit more. Repeat with remaining dough, or reserve dough, refrigerated, for baking remaining batches the next day. Eat warm, with a big napkin.

Tuesday, March 30, 2010

Laura Potter's Bread

Back when I was an intern, I would listen to podcasts from a local radio show. I don't remember what it was even called, but I do know that a lot of the show revolved around cooking. One lady in particular, I'm assuming her name is Laura Potter based on the name of the bread, peaked my interest. She talked about homemade bread, and how a good friend of hers came to her home one day to show her just how easy it was to make homemade bread.

Easy homemade bread? She had me. It probably helped that she was describing the sweet smell of bread cooking in her oven, and biting into that warm, tender bread. I rushed home that very day to make it.


This bread is everything you imagine in homemade bread. I made it with all white flour, and it reminded me of the kind of bread that was considered a treat when topped with some butter and homemade jam. It was light, fluffy, chewy, and delicious.


For some reason, I let this recipe fade away into my binder full of tried and true recipes. I'm not sure what it was that made me turn back to it today, but I'm so glad that I did! Try it out, and enjoy!


Laura Potter's Bread
Makes 2 loaves (adapted from a recipe that made 5 loaves)

2 cups hot water (out of the tap)
1/4 cup + 1 tbsp oil
1/4 cup + 1 tbsp honey
2 tsp salt
1/5 cup Powdered milk
2 1/3 cups flour (any combination of white and wheat - if mixing flours, start with white)
2 1/2 tsp saf-instant yeast
3 cups flour (any combination of white and wheat - if mixing flours, start with white)

Combine ingredients in the order listed above in a stand-mixer bowl fitted with dough hook, saving the last 3 cups of flour to add later. After adding the yeast, turn mixer on and let ingredients combine slowly. Add the remaining 3 cups of flour, until the dough starts pulling off of the sides of the mixer. Turn mixer to high and knead for 8 minutes. Cover the bowl and allow the dough to rise for 20 minutes. Preheat oven to 150 degrees.

Once dough has risen, divide the dough into 2 even balls. Place on a floured surface and with your fingers, lightly press each ball into a rectangular shape about the length of a bread pan. Roll into loaves and place them seam side down in pans sprayed with cooking spray.

Place pans in oven and allow to rise for 20 minutes. Then raise the temperature to 350 degrees and bake for 25-30 minutes. Remove from oven. Then remove the bread from the pans and allow to cool slightly before slicing.

Friday, March 26, 2010

Time flies!

Has it really been over a month since I posted? I've been baking and taking pictures, I just haven't done anything else! Here's a quick run down of the things I've made:

Mint Chocolate cookies. I was on a bit of a mint kick, and had some Andes Mints chips in the cupboard. I decided to use an old chocolate chip cookie recipe, and just made a few substitutions. I cut the flour amount by a half cup and added in a half cup of cocoa powder, and instead of vanilla extract, I used pure mint extract. I loved them! But then again, I love anything with mint...


In honor of Pi day (3/14 - yes, my husband is to blame for this one), I made a fresh strawberry pie. I used Sylvia's Perfect Pie Crust, and it was perfect for this pie (and now I have 2 more crusts in the freezer, just ready to use). I had a box of Danish Dessert in my cupboard, and decided to try it for the first time. It was great for the purpose I needed it for. This is kind of embarrassing, but my husband and I devoured this pie in 2 days.


And last, but not least, I made some shamrock cookies for everybody's favorite green holiday. I decided to try out Brown Eyed Baker's sugar cookie with royal icing. The cookie had great texture and a nice buttery flavor. I've never worked with royal icing before, and although it takes a bit of time, the result is beautiful. I'm still partial to cream cheese frosting, but I think there is something to be said for a smooth, perfectly iced cookie. Note to self - buy Wilton's icing color in green to get fabulous green color like Brown Eyed Baker.

Saturday, February 20, 2010

Lemon Meringue Cupcakes

It was a Sunday, we were going to dinner at a friend's house, and at the last minute I offered to bring dessert. Luckily I had everything on hand for these cupcakes, and they turned out just as I imagined. I knew there was a reason I bookmarked this 6 months ago and looked at it at least once a week!

The best way to describe these cupcakes is that you get the best of two worlds - cake and pie. And who doesn't like lemon?! It was just the right amount of sweet and tart, and I loved the little "surprise" of lemon curd on top of the cupcake. I didn't have a kitchen torch to brown the meringue, so I just stuck them in the oven with the broiler on until they were sufficiently browned. I think they turned out delicious!


Lemon Meringue Cupcakes
from Martha Stewart
makes 24 cupcakes

3 cups all-purpose flour
1 tablespoon baking powder
1/2 teaspoon salt
1 cup (2 sticks) unsalted butter, room temperature
2 cups sugar
4 large eggs, room temperature
Finely grated zest of 3 lemons (about 3 tablespoons), plus 2 tablespoons fresh lemon juice
1 teaspoon pure vanilla extract
1 cup buttermilk
Lemon Curd (see below)
Seven-Minute Frosting (see below)

Preheat oven to 325 degrees. Line standard muffin tins with paper liners. Whisk together flour, baking powder, and salt.


With an electric mixer on medium-high speed, cream butter and sugar until pale and fluffy. Add eggs, one at a time, beating until each is until incorporated, scraping down sides of bowl as needed. Beat in zest and vanilla. Add flour mixture in three batches, alternating with two additions of buttermilk and lemon juice, and beating until just combined after each.


Divide batter evenly among lined cups, filling each three-quarters full. Bake, rotating tins halfway through, until golden brown and a cake tester inserted in centers comes out clean, about 25 minutes. Transfer tins to wire racks to cool completely before removing cupcakes. Cupcakes can be stored overnight at room temperature, or frozen up to 2 months, in airtight containers.


To finish, spread 1 tablespoon lemon curd onto middle of each cupcake. Fill a pastry bag fitted with a large open-star tip (Ateco #828 or Wilton #8B) with frosting. Pipe frosting onto each cupcake, swirling tip slightly and releasing as you pull up to form a peak. Hold a small kitchen torch 3 to 4 inches from surface of frosting, and wave it back and forth until frosting is lightly browned all over. Serve immediately.


Lemon Curd
makes about 2 cups

8 large egg yolks
Finely grated zest of 2 lemons
1/2 cup plus 2 tablespoons freshly squeezed lemon juice (about 3 lemons)
1 cup sugar
1/8 teaspoon salt
1 1/4 sticks (10 tablespoons) unsalted butter, cold, cut into pieces

Combine yolks, lemon zest, lemon juice, and sugar in a heavy-bottom saucepan; whisk to combine. Cook over medium-high heat, stirring constantly with a wooden spoon (be sure to scrape the sides of the pan), until the mixture is thick enough to coat the back of the spoon, 8 to 10 minutes, and registers 160 degrees on an instant-read thermometer.


Remove saucepan from heat. Add salt and butter, one piece at a time, stirring until smooth. Strain through a fine sieve into a medium bowl. Cover with plastic wrap, pressing it directly onto the surface of the curd to prevent a skin from forming. Refrigerate until chilled and set, at least 1 hour or up to 1 day.

Seven-Minute Frosting
makes about 8 cups

1 1/2 cups plus 2 tablespoons sugar
2/3 cup water
2 tablespoons light corn syrup
6 large egg whites, room temperature

Combine 1 1/2 cups sugar with the water and corn syrup in a small saucepan; clip a candy thermometer to side of pan. Bring to a boil over medium heat, stirring occasionally, until sugar dissolves. Continue boiling, without stirring, until syrup reaches 230 degrees.


Meanwhile, in the bowl of a standing electric mixer fitted with the whisk attachment, whisk egg whites on medium-high speed until soft peaks form. With mixer running, add remaining 2 tablespoons sugar, beating to combine.


As soon as sugar syrup reaches 230 degrees, remove from heat. With mixer on medium-low speed, pour syrup down side of bowl in a slow, steady stream. Raise speed to medium-high; whisk until mixture is completely cool (test by touching the bottom of the bowl) and stiff (but not dry) peaks form, about 7 minutes. Use immediately.

Thursday, February 4, 2010

Oatmeal Cookies

The other night some ladies from my church got together to make some centerpieces for a conference we were having. I wanted to make them a treat for helping out, so I headed to the computer for a recipe. I've had this oatmeal cookie recipe bookmarked for awhile, and decided to give it a go.


These cookies had great flavor, were moist, chock full of oats, and I loved the combination of cranberries and walnuts. Delicious!

Oatmeal Cookies
from Joy of Baking

1 cup walnuts or pecans, toasted and chopped (optional)
3/4 cup unsalted butter, room temperature
1 cup light brown sugar
1 large egg
1 tsp pure vanilla extract
3/4 cup all purpose flour
½ tsp baking soda
½ tsp salt
½ tsp ground cinnamon
3 cups old-fashioned rolled oats
1 cup dried cranberries, cherries, raisins or chocolate chips (optional)

To toast nuts: Preheat oven to 350 degrees F and toast nuts for 8-10 minutes until lightly browned and fragrant. Let cool and then chop into pieces. Set aside.

Line 2 baking sheets with parchment paper.

In the bowl of your electric mixer, cream the butter and sugar until creamy and smooth (about 2-3 minutes). Add the egg and vanilla extract and beat to combine. In a separate bowl, whisk together the flour, baking soda, salt, and ground cinnamon. Add the flour mixture to the creamed mixture and beat until incorporated. Stir in the nuts, oats, and dried cranberries or chocolate chips.

For large cookies, use 1/4 cup of batter (I like to use an ice cream scoop) and space the cookies about 2 inches apart on the baking sheet. Then wet your hand and flatten the cookies slightly with your fingers so they are about 1/2 inch thick. Bake the cookies for about 12 - 15 minutes at 350 degrees F, or until light golden brown around the edges but still soft and a little wet in the centers. Remove from oven and let the cookies cool a few minutes on the baking sheet before transferring them to a wire rack to cool.

Makes about 20 - 24 large cookies

Monday, January 25, 2010

Classic English Shortbread

My friend gave me some lemon curd for Christmas and told me that it's really good with shortbread. I had every intention of buying shortbread at the store (to save me a little work), but every time I would go out, I'd forget to get it.

I had never made shortbread before, so maybe that's why I thought it would be "work." It's not. It's easy. So easy.


When I bit into this shortbread the words that came to mind were buttery, flaky, and tender. I read somewhere that using powdered sugar instead of granulated sugar makes the shortbread more flaky.

And the combination of shortbread and lemon curd? Think lemon meringue pie without the meringue. Mmmm.


Classic English Shortbread

1/2 cup salted butter, at room temperature
1/3 cup confectioners' sugar
1/4 tsp vanilla extract
1 cup flour, unsifted

Pre-heat oven to 325 degrees.

In bowl of a stand mixer with the paddle attachment, cream the butter and confectioners' sugar. Add the vanilla and mix until combined. Add the flour 1/2 cup at a time, mixing until combined.

Spray a 9" springform pan (or other flat pan) with non-stick spray. Press the dough into the bottom of the pan until a uniform thickness.

Bake for about 25 - 30 minutes until lightly browned. Remove and let it cool for about 10 minutes. Transfer the shortbread to a wooden cutting board and cut into serving sized pieces while it is still warm. Allow cut pieces to cool completely before storing away.

This recipe multiplies nicely by 2 or 3 if you need a larger batch.

Wednesday, January 20, 2010

Cupcake Bake-off

My husband had a cupcake bake-off at his work the other day. He was told by his coworkers that he had to actually make the cupcake himself. What did they think would happen? That I would hijack the project and take over and make the cupcakes myself? That's so not me. I'm not like my husband who takes over anytime I start making something in the wok (I'm only kidding, honey).

The biggest task at hand was to decide what kind of cupcake to make. After thinking about it for a day or two, my husband turned to me and said, "I want to make a peanut butter chocolate cupcake." Well, alright! Let's do it!


I started scouring the internet for "the best chocolate cupcake recipe." Well, as you can only imagine, there are hundreds, if not thousands, of recipes out there claiming to be "the best chocolate cupcake recipe." Oy.

When I landed on a recipe from Cooks' Illustrated, I knew we had a winner. We didn't have enough time to test out the recipe (which is really a no-no when you're entering a recipe in a contest, just so you know), so we had to use a recipe from a source we trusted. And as I've mentioned before, we trust Cooks' Illustrated.

The recipe is for Dark Chocolate Cupcakes, and well, they taste dark. The texture was actually very pleasant, as was the taste and moistness. I think the only thing lacking was sweetness. If we had it to do over again, my husband and I agree that a little more sugar would be ideal.

As for the Peanut Butter Icing, all I can say is wow. It was delicious. Creamy. Peanut buttery. Melt in your mouth goodness. I'm starting to notice a pattern here - whenever I make icing, it's always amazing. It makes anything taste that much better. Now I know exactly where the phrase 'icing on the cake' comes from.

Oh, and just in case you were wondering, my husband made the cupcakes all by himself.


Dark Chocolate Cupcakes
from Cooks' Illustrated, "American Classics 2009"
makes 12 cupcakes; do not double recipe...make two separate batches if you need more

8 tbsp (1 stick) unsalted butter, cut into 4 pieces
2 oz bittersweet chocolate, chopped
1/2 cup (1 1/2 oz) Dutch-processed cocoa
3/4 cup (3 3/4 oz) unbleached all-purpose flour
1/2 tsp baking soda
3/4 tsp baking powder
2 large eggs
3/4 cup (5 1/4 oz) sugar
1 tsp vanilla extract
1/2 tsp table salt
1/2 cup (4 oz) sour cream

Adjust oven rack to lower-middle position; heat oven to 350 degrees. Line standard-sized muffing pan (1/2 cup capacity) with baking cup liners.

Combine butter, chocolate and cocoa in medium heatproof bowl. Set bowl over saucepan containing barely simmering water; heat mixture until butter and chocolate are melted and whisk until smooth and fully combined. Set aside to cool until just warm to touch.

Whisk flour, baking soda and baking powder in small bowl to combine.

Whisk eggs in second medium bowl to combine; add sugar, vanilla and salt and whisk until fully incorporated. Add cooled chocolate mixture and whisk until combined. Sift about one-third of flour mixture over chocolate mixture and whisk until combined; whisk in sour cream until combined; then sift in remaining flour mixture and whisk batter until it is homogenous and thick.

Divide batter evenly among muffin pan cups. Bake until skewer inserted into center of cupcakes comes out clean, 18-20 minutes.

Cool cupcakes in muffin pan on wire rack until cool enough to handle, about 15 minutes. Carefully lift each cupcake from muffin pan and set on wire rack. Cool to room temperature before icing, about 30 minutes.


Kathleen's Peanut Butter Icing
from Ina Garten, as seen on the Food Network

1 cup confectioners' sugar
1 cup creamy peanut butter
5 tbsp unsalted butter, at room temperature
3/4 tsp pure vanilla extract
1/4 tsp kosher salt
1/3 cup heavy cream

Place the confectioners' sugar, peanut butter, butter, vanilla, and salt in the bowl of an electric mixer fitted with a paddle attachment. Mix on medium-low speed until creamy, scraping down the bowl with a rubber spatula as you work. Add the cream and beat on high speed until the mixture is light and smooth.

Monday, January 18, 2010

Beater Blade

My awesome husband gave me a Beater Blade for Christmas. What is a beater blade you ask? It's this awesome attachment for your stand mixer that eliminates the need to scrape down the sides of the bowl, and you won't get any more build up on the blades.

So the real question is, does it work? I have used it a few times since getting it, and I have to say it works beautifully. I have always hated having to scrape down the sides of the bowl because somehow my hand always ends up getting some of the batter on it, and then the handle of the spatula I'm using gets batter on it, and it turns into a sticky mess. Well, I don't have to worry about that any more! It really does work! (And no, Beater Blade is not paying me to say this - I just think that a good product should get a good review).

Friday, January 15, 2010

Chocolate Peanut Butter Cookies

When I was in Hershey, PA this past summer, I found these awesome Reese's Premier Baking Pieces. They are like little mini Reese's peanut butter cups just for baking. How cool is that?

I quickly snatched up a few bags, and then held on to them, refusing to use them because they were so special and I hadn't seen them being sold anywhere else.

I don't know why, but I have been wanting chocolate, chocolate, chocolate for the past month or so. Every time I think of a treat that sounds good, it inevitably has chocolate in it. So when I got the urge to make some cookies, and I saw these Reese's baking pieces in the pantry, I decided to take the plunge and make some CHOCOLATE peanut butter cookies. It just sounded so good to me!

I decided to use a tried and true chocolate chip cookie recipe, but just substituted a little bit of the flour with some high quality cocoa. The trick to these cookies is to underbake them. That way you get a nice chewy texture. These cookies turned out nicely, and just for a little more emphasis on the chocolate, I added in some semi-sweet chips. Yum!


Chocolate Peanut Butter Cookies

1 cup shortening
1 cup brown sugar
1/2 cup white sugar
2 eggs
2 tsp vanilla
2 cups all-purpose flour
1/4 cup cocoa powder
1 tsp salt
1 tsp baking soda
1 pkg Reese's premier baking pieces
1/2 cup semi-sweet chocolate chips

Preheat oven to 365 degrees.

Cream together the shortening, brown sugar, and white sugar. Add the eggs, one at a time, and the vanilla, mixing until just combined.

Combing the flour, cocoa powder, salt, and baking soda in a small bowl. Add to the wet ingredients, mixing until just combined. Stir in the Reese's premier baking pieces and semi-sweet chocolate chips.

Roll into 1-inch balls and place on baking sheet. Bake for 10-12 minutes. Underbake.

Sunday, January 10, 2010

Here in America's Test Kitchen...

Have you ever seen this show? Or heard of Cooks' Illustrated? If the answer is no, you are missing out, my friend! These people test every recipe hundreds of different ways until they get the right one. They test every kitchen product until they find which one works the best. Their recommendations are tried and true, and I trust their recipes.

But when I saw a recipe for a cinnamon bun made without yeast, I was skeptical. I am not a cinnamon bun connoisseur by any means, but I've had some good homemade cinnamon buns and some not so good store bought ones. And I can tell the difference. Up until this point, I thought ALL homemade cinnamon buns had to be made with yeast. But America's Test Kitchen came out with a quick cinnamon bun recipe, and I had to give it a try.

So what makes this a "quick" cinnamon bun? Well, you don't have to knead the dough for a long time, or wait for the dough to rise (several times). On average, a standard yeasted bun takes about 5 hours to make. The quick buns, from start to finish, take an hour.

As for taste, I actually did like the bun. It was tender and rich. The icing was very nice, using buttermilk, powdered sugar, and cream cheese. To be honest, I don't think your average person would be able to tell whether it was a yeasted bun or not. So, if you need a quick cinnamon bun, try these. I think you'll like them.


Quick Cinnamon Buns with Buttermilk Icing
from the cookbook, Here in America's Test Kitchen
Makes 8 buns.

Melted butter is used in both the filling and the dough and to grease the pan; melt the total amount (8 tablespoons) at once and measure it out as you need it.

1 tbsp unsalted butter, melted, for pan

cinnamon-sugar filling
3/4 cup (5 1/4 oz) packed dark brown sugar
1/4 cup (1 3/4 oz) granulated sugar
2 tsp ground cinnamon
1/8 tsp ground cloves
1/8 tsp salt
1 tbsp unsalted butter, melted

biscuit dough
2 1/2 cups (12 1/2 oz) unbleached all-purpose flour, plus additional flour for work surface
2 tbsp granulated sugar
1 1/4 tsp baking powder
1/2 tsp baking soda
1/2 tsp salt
1 1/4 cups buttermilk
6 tbsp unsalted butter, melted

icing
2 tbsp cream cheese, softened
2 tbsp buttermilk
1 cup (4 oz) confectioners' sugar

1. Adjust oven rack to upper-middle position and heat oven to 425 degrees. Pour 1 tbsp melted butter into 9-inch nonstick cake pan; brush to coat pan. Spray wire cooling rack with nonstick cooking spray; set aside.

2. TO MAKE CINNAMON-SUGAR FILLING: Combine sugars, spices, and salt in small bowl. Add 1 tablespoon melted butter and stir with fork or fingers until mixture resembles wet sand; set filling mixture aside.

3. TO MAKE BISCUIT DOUGH: Whisk flour, sugar, baking powder, baking soda, and salt in large bowl. Whisk buttermilk and 2 tablespoons melted butter in measuring cup or small bowl. Add liquid to dry ingredients and stir with wooden spoon until liquid is absorbed (dough will look very shaggy), about 30 seconds. Transfer dough to lightly floured work surface and knead until just smooth and no longer shaggy.

4. Pat dough with hands into 12 by 9-inch rectangle. Brush dough with 2 tablespoons melted butter. Sprinkle evenly with filling, leaving 1/2-inch border of plain dough around edges. Press filling firmly into dough. Using bench scraper or metal spatula, loosen dough from work surface. Starting at long side, roll dough, pressing lightly, to form tight log. Pinch seam to seal. Roll log seam-side down and cut evenly into eight pieces. With hand, slightly flatten each piece of dough to seal open edges and keep filling in place. Place one roll in center of prepared nonstick pan, then place remaining seven rolls around perimeter of pan. Brush with 2 tablespoons remaining melted butter.

5. Bake until edges are golden brown, 23 to 25 minutes. Use offset metal spatula to loosen buns from pan. Wearing oven mitt, place large plate over pan and invert buns onto plate. Place greased cooling rack over plate and invert buns onto rack. Cool about 5 minutes before icing.

6. TO MAKE ICING AND FINISH BUNS: While buns are cooling, line rimmed baking sheet with parchment paper (for easy cleanup); set rack with buns over baking sheet. Whisk cream cheese and buttermilk in large nonreactive bowl until thick and smooth (mixture will look like cottage cheese at first). Sift confectioners' sugar over; whisk until smooth glaze forms, about 30 seconds. Spoon glaze evenly over buns; serve immediately. The buns are best eaten warm, but they hold up reasonably well for up to 2 hours.